Saturday, December 31, 2016

TAT 2017 Post 9 12/31/16

Again another modification update for my 2016 KTM 350 EXC-F Dual-Sport.

In my last several posts I described several modifications I had completed to include:

1          3.45 gal (13L) fuel tank (KTM OEM)
2          Emissions removal kit from KTMandHusky.com
3          Fuel Rail from KTMandHusky.com
4          Wheel Balance Weights from KTMandHusky.com

At the end of that activity I mounted the fuel tank onto the bike, poured about a half-gallon of fuel in the tank and immediately leaked out most of it from the fittings on the bottom of the tank. The truth is that I expected this to happen. While cleaning up the garage after installing the above mods I found a rubber O-ring on the floor. It could only have come from the fuel tank mod as I was installing the pump. I thought I had been very careful to ensure it all went together as required but somehow the O-ring had dropped off the fitting during my assembly.

Yesterday 
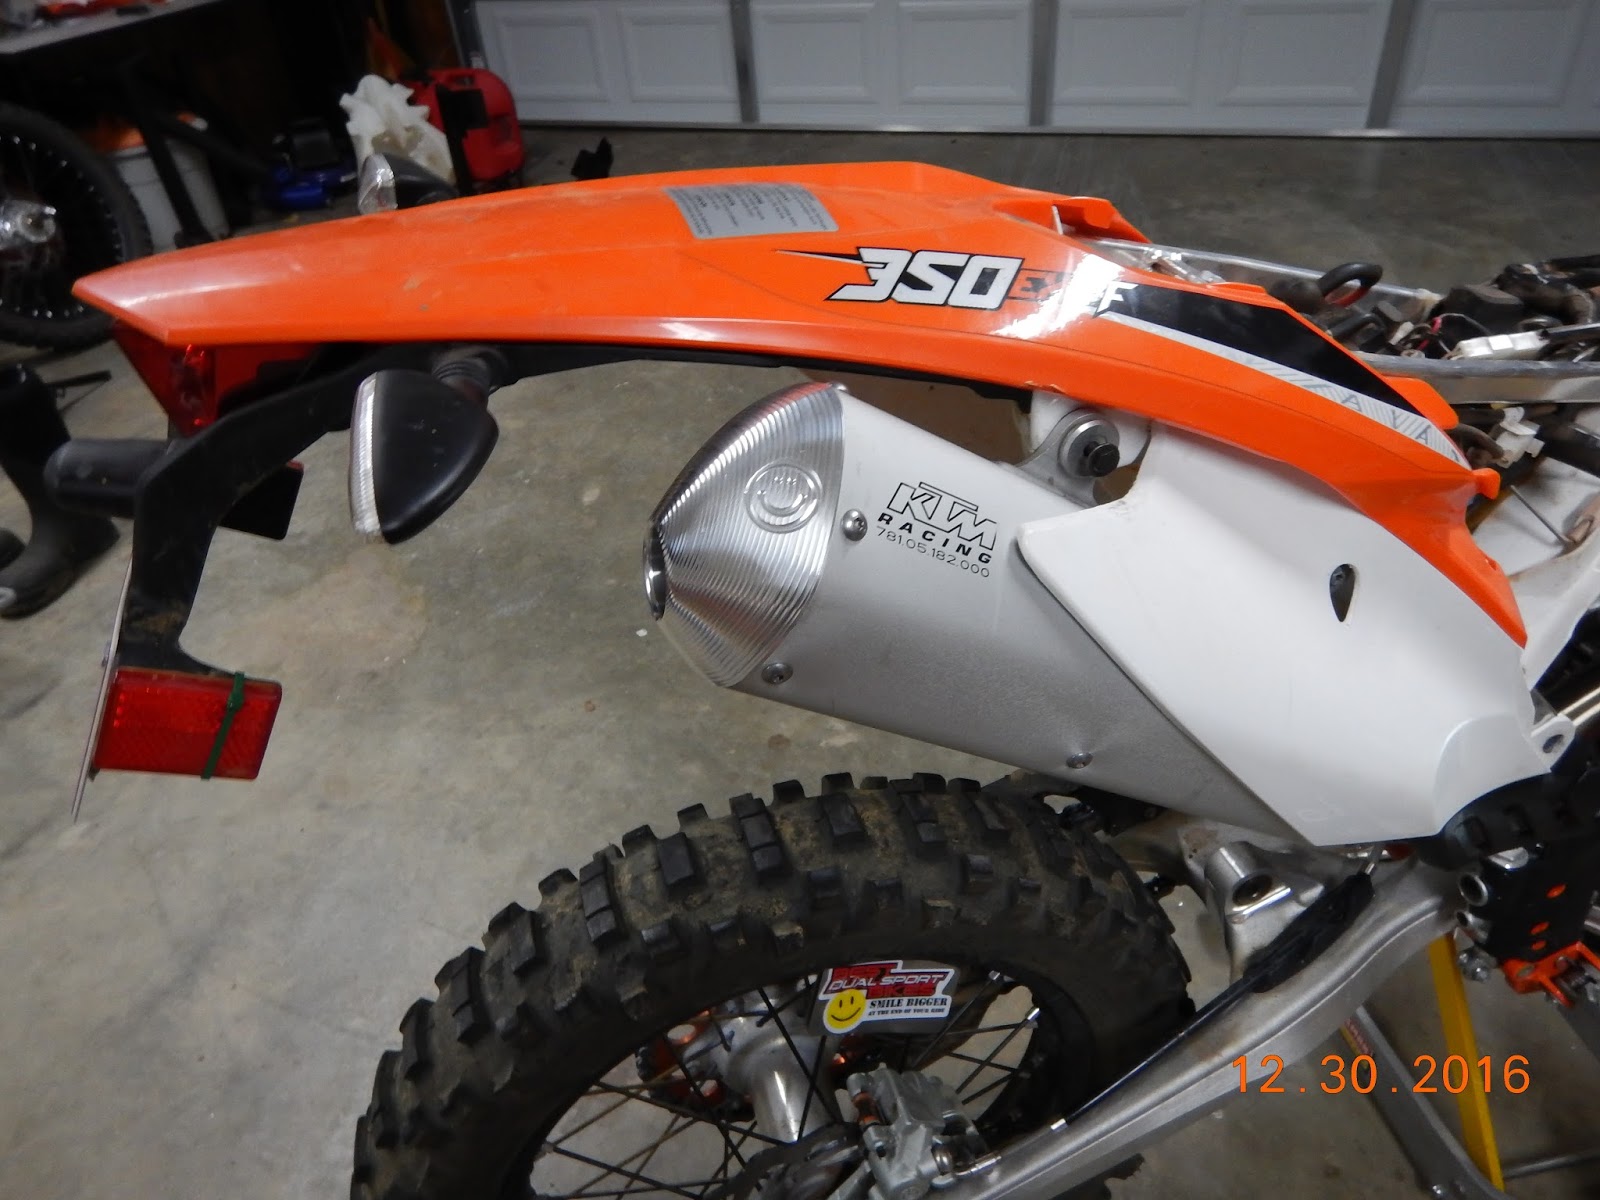
and today I spent several hours installing the following modifications:

5          Grunt Mod from KTMandHusky.com (exhaust port)
6          Snap Insert from KTMandHusky.com (intake baffle)
7          Muffler End Cap from KTMandHusky.com
8          Repair leaking fuel tank

During the fuel pump transfer from the original tank to the new tank I had noticed that the fuel outlet fitting had an O-ring both on the inside and outside of the tank but the other larger support plug only had an O-ring on the outside. I assumed the O-ring found on the floor must be used on the support plug but on the inside of the tank. I suspected it came off while removing the pump and had fallen out of the old tank while moving it around. I looked through several documents on the web trying to see a good parts break-down of this area but didn’t find anything good enough to tell me if both plugs have double O-rings. Therefore I expected to have to remove and replace the fuel pump again to install the O-ring.

The first three modifications went quickly and I then started the teardown of the fuel tank to fix the leaking fitting. As I was removing the bottom two fittings I quickly noticed that the O-ring was missing from the fuel fitting on the outside of the tank! Fantastic, I didn’t have to remove the pump. Somehow the O-ring had come off during my assembly of the fuel tank, just lucky that I found it on the floor. I re-installed the O-ring and fittings, poured some gas into the tank and found the fittings and line dry as a bone. I installed the tank on the bike, temporarily connected the headlight module with the key-ignition and tried to start the engine.
I could hear the fuel pump prime the line and then tried the starter. It took several tries but the engine finally fired up and ran exceptionally smooth. The pipe sounded louder but not by much but it did have an exceptionally low meaty sound! Can’t wait to get back to riding the KTM to see how all these mods impact its performance.

During the last few mods I went through all the areas I had been working and applied locktight where required and torqued bolts. It is now ready for the upgraded struts and rear shock due back in mid-January, just in time for cold weather to come roaring through the mid-west.

Snap Insert


End Cap


Fuel Tank


Leg-3 Initial Plans:

I’ve completed the planning for Leg-3 and have received commitments from one other rider (my son Jeff) and a new support truck driver (Michael). BTW I’m Mike and he’s Michael in all follow-on posts. The remaining three core TAT riders are pretty sure they will be going and will commit in the near future; Woodrow, Terry and Steve. We may even pick up a couple more friends and family members but as we found on Leg-2 (CO-AR), a smaller group works better than a large herd of riders.

The key points of Leg-3 are listed below but I will provide more detail in future posts:

Dates:                                                            mid July 2017
Ride days:                                                     6 (Monday through Saturday)
Total trip days including shuttle of bikes     15 days
Departure Point:                                            Lake City, CO
End Point:                                                      Ketchum, ID
TAT miles:                                                     1171

We have modified the TAT route in one area and I’m sure this will generate comments. As we come up to the Interstate Highway to Salt Lake City we are heading North on back roads and reconnect with the TAT just North of the Great Salt Lake. This reduces the route by about 150 miles but mainly it eliminates the long desert run to Nevada, north along the Nevada/Utah border then return to Salt Lake. I’m sure there are many scenic sites along that stretch but it also has many miles of nothing but desert. Our TAT adventure is a coast-to-coast ride on Dual-sports, not a 100% ride of every mile of the TAT even though we will use more than 90% of the TAT route. Our team has time constraints and we want to complete the whole adventure NLT 2018. If we do Leg-3 in 2017 it will leave about 1200 miles for Leg-4 (ID to OR) in 2018.

Leg-3 Route


Happy New Year!


Tuesday, December 27, 2016

TAT 2017 Post 8 12/27/16

Another modification update for my 2016 KTM 350 EXC-F Dual-Sport.

In my last post I explained how I removed and shipped my struts and rear shock to KTMWorld to be upgraded with heavier springs, re-valved and lowered 2”. They arrived safely at KTMWorld and will be worked after the holidays. I hope to get them back sometime in mid- January. BTW if you plan on doing this to your KTM, I had a UPS shipping office pack my items with the final weight of 35 lbs and shipping cost, including $3,000 insurance, of $228. Nobody ever said upgrading a dual-sport was cheap.

With my bike in a pretty stripped down condition for the next month or so I decided to incorporate a few mods that I found on the BestDualSportBikes.com web page (referenced as BDSB in this post). They are changing their name to KTMandHusky.com but this is a great site if you have a KTM dual sport.


BDSB has focused on upgrades for the KTM 500 EXC-F but also have them for the 350 EXC-F. I ordered, received and installed this week-end several of their modifications described below and have 2 more on order.

Sorry if this post gets a bit “wordy” but I hope my experiences descried in detail below saves others trying to figure how to install these modifications.

Installed:

Emissions removal kit


This kit includes several items to plug holes in the various parts of the engine as you remove all the plumbing and emissions hardware. Most of the items come off easily except for the air valve attached to the front of the engine. On the KTM 500 this valve is on the right side and easily accessible. On the 350 it is in a very tight area close to the exhaust header and bike frame. The instructions that come with the kit and the videos help a lot but they mostly talk about the 500. After working for some time trying to gain access to the nut that removes the air valve I contacted BDSB and asked if there was an easier way to remove the valve or must I remove the muffler, header pipe and exhaust port. They responded promptly and confirmed that on the 350 that was the only way to get it off.

As a result, I removed the muffler, header pipe and exhaust port, all of which can be accomplished quickly except for the springs holding the header pipe into the exhaust port. I’m sure there is a tool that makes this easy but I didn’t have the tool so I had to improvise using a screw driver and awl (ice pick type of tool). I finally got the springs off but not sure how easy it will be to reinstall.

I now had access to the air valve nut and could barely reach it with a 17mm wrench. The nut loosened easily enough but the key is that the whole valve unit has to rotate to unscrew out of the engine block. Not enough room to rotate!! After trying to disassemble the valve using the Philips head screws I had basically rounded off the Philips cross in the screw heads. Now I was the one that was screwed. I then decided to drill out the screw heads using a 12” long drill bit. This worked perfectly and the screws were made of aluminum it appears. With the screws removed, the valve came apart and the part remaining in the engine block was small enough to rotate completely out of the block. I then installed the plug provided in the kit to seal up this hole.

The picture below shows the parts removed including the air valve. This really cleans up the engine plus eliminates the popping and backfires as you decelerate.


Fuel Rail


I had no idea what this was until I watched all the videos on the BDSB web page. The guys are pretty convincing so I took the hook and ordered this modification. It basically improves the fuel flow to the fuel injector by eliminating sharp bends in the plumbing on the throttle body. The only problem is that it requires digging down to the guts of the bike to get access to the throttle body. Once again, since the bike was already partially disassembled I decided now was the time to make this mod. It promises better engine performance and throttle response.

To get to the throttle body the shock is removed (already done) and the rear sub-frame is lifted by removing the bottom two bolts and loosening the top two bolts. The guy in the video and the instructions provided with the kit tells you to be a man and lift the frame with gusto but if you are a wimp, take it to a professional (funny guy). I was a bit nervous ripping my new bike apart like this but it worked and the pictures below show it in the up position. This provides adequate room to loosen the throttle body and pull it back about an inch so you can remove the old fuel plumbing and install the new connection (fuel rail) provided in the kit. This was accomplished and it went back together without much problem. The hardest part was routing the original fuel line through the frame and other components to connect to the fuel rail without putting a kink in the fuel line. I think I did that but won’t know until I get the bike back together in January and run the engine. It will be a pain to have to take it all apart to fix this if it does have a kink in the line.


Wheel Balance Weights


In a previous post I talked about how I felt this bike was dangerous over 55 mph because of the front end being almost unmanageable. The BDSB video explains why this happens and it makes sense to me so I installed their wheel weights on my bike. The cause is that the valve stem and wheel lock are on the same side of the tire to make it easier to remove the tire. What it also does is put lots of weight on one side without any counter-balance on the other side. The BDSB wheel weights are steel plates that attach to the bike spokes on the opposite side of the wheel from the valve stem and wheel lock. I won’t know if this works until I put the bike back together but anything would be an improvement.


On order:

GRUNT Mod & Snap Insert


Because I had to remove the exhaust port as part of the emissions removal kit, I decided to install the BDSB GRUNT mod. This is a machined exhaust port that improves the air flow of the exhaust gasses as they leave the engine block. I was a bit skeptical about this mod but I know that when I installed the FMF muffler and exhaust header modification on my Honda CRF 250L it turned that bike into a different animal and I rode it 3000 miles from the Atlantic Ocean to the Rocky Mountains with excellent results. Should get this mod kit in a week or so then I’ll reinstall my exhaust system.

Muffler End Cap


This mod is another improvement for the exhaust system. The original muffler end cap is very restrictive and has a detrimental impact on engine performance. The new end cap removes this restriction. The end cap mod and the GRUNT mod have a promised increase of 6-7 horse power. I assume this is for the KTM 500 EXC-F so only expect maybe 4 additional horsepower for the 350.

Additional Modifications to be accomplished when Bike is reassembled:

Throttle Position Sensor (TPS)


I purchased the TPS adjustment meter described in the video above and plan on performing this adjustment as soon as the bike is reassembled with the upgraded struts and rear shock. The TPS appears to be a critical component of engine performance and considering that I have modified the fuel flow into the throttle body (New Fuel Tank & Fuel Rail mod) and the exhaust out of the engine (GRUNT and End Cap mods) I expect this definitely needs to be addressed. I’ll provide the results of this effort in a future post.

ReKluse Auto-Clutch

Final Gearing (sprockets and chain)

I know from reading several blogs that the stock gearing for the KTM is not optimal but was selected solely to pass government noise standards (riding past a microphone at a set speed to sample noise output of the bike). My dilemma is that of the multiple forums I’ve read on this subject I get varying answers as to what the best gearing would be for my riding requirements. I changed the gearing on my Honda CRF 250L and this greatly improved the performance on both off-road and highway. It was a compromise between the two but it worked and now I have the same issue with the KTM. Here is a summary of my requirements so I welcome input from other KTM 350 riders:

1               Interstate highway riding only under extreme circumstances (never if possible) 70 mph max
2               Occasional paved secondary roads with speeds 55-65 mph
3               Primarily Gravel & Dirt Roads with speeds 35-55 mph
4               ATV & 4X4 dual track trails, some pretty rough
5               Mountain Passes including steep switch backs on slick rocks and wet trails
6               Occasional mud and sand including water crossings
7               Very little single track during day to day riding and none on the TAT
8               No radicle hill climbing

I guess to summarize, I need the KTM to be able to carry me and my gear through the Rocky Mountains and Utah Desert on 4x4 roads yet still be able to take a 2-lane highway to get to the next stretch of the TAT.

Final Comments:

I’m a firm believer that if you are going to take the road least traveled on an Adventure Bike or Dual-Sport you better know how to keep it running. As a result, I have not only the owner’s manual that came with the KTM but also the Service Manual with all the electrical schematics. This bike is so basic compared to the Yamaha Super Tenerie I rode to Alaska and the Arctic Circle and even more basic than the Honda CRF 250L on which I have ridden 3000 miles of the TAT so far. Therefore it has been a good learning experience doing the modifications listed above and I feel a lot more confident in being able to keep this bike running through the last 2400 miles of the TAT.

BTW, neither the owner’s manual nor the service manual even mention or describe the emissions system on the KTM so I have to assume they expect you to leave it alone!


Saturday, December 17, 2016

TAT 2017 Post 7 12/17/16

It’s been almost a month since my last post so decided to provide an update on my KTM modifications in anticipation of Leg 3 (Colorado to Idaho) in 2017.

My last post received several comments about the unsuitability of the KTM 350 EXC-F (referenced as KTM in this post) for riding the TAT. Sadly I have to agree with several of the comments but not that the KTM is unsuitable only because I don’t think there is such a thing. If you read lots of Blogs as I do you realize all sizes and types of bikes have been used to ride the TAT from Honda 90’s to super-sized adventure bikes. We even pasted a group of TAT riders in August riding gas-powered bicycles! Each trip is unique and you have to recognize the bike and rider capabilities and adapt your riding approach as necessary. That is what I plan on doing and the KTM will be going on the next leg of the TAT in 2017.

KTM modifications:

I’ve posted details of my concerns with the KTM in earlier posts so won’t repeat them here. Note that I didn’t say KTM shortfalls, only my concerns based on my abilities and the type of riding I expect to do on Leg 3 & 4.

Fuel Range – The stock 2.25 gal tank just won’t provide the range necessary for the TAT. My last mpg check indicated I was getting 60 mpg but I don’t trust that number. I expected more around 50 or less. 60 mpg gives a range of 135 miles and 50 mpg gives a range of 112 miles. Both are too low. I want at least 150 or better range so I had only 2 choices; bigger tank or carry fuel in a RotoPax. My experience carrying a 1 gal RotoPax weighing 9 lbs on the 130 mile Sooner Adventure last month proved that the rear frame isn’t able to carry heavy weight mounted far to the rear on the rack. Therefore I purchased the KTM OEM 3.45 gal (13 liter) tank. With this tank my range should be 60 mpg = 207 miles or 50 mpg = 172 miles, both which are acceptable. BTW the KTM tank is so easy to remove, I love it. They even provide quick disconnect for the fuel line. I installed the new tank today and it is big compared to the stock tank. That being said, it doesn’t appear to impact the riding position but I won’t know for sure till the bike is reassembled in January.

Soft Suspension – As I stated in an earlier post, the KTM suspension was set up for a rider weight of around 175-185 lbs. I guess they thought only skinny kids would ride this bike. Well I’m not skinny and my weight info is provided below (I only provide this info so you can understand why I’m upgrading the suspension)

Rider weight out of the shower (please ignore the visual this may generate) - 197 lbs

All riding gear, including boots, helmet, armor, and heavy jacket and pants - 23 lbs

Normal riding gear - Tank bag, 2 GPS, cell phone, spare AA/AAA batteries, tools, first aid kit, rain gear and the extra fuel in the new tank – 26 lbs

This means that for normal riding in cool temperatures my total load is 23 + 220 + 26 = 246 lbs. This is the weight being used to upgrade the suspension.
I shipped this morning my front struts and rear shock to KTM World in Georgia to put heavy weight springs and re-valve for a smoother ride (I am 69 after all).

Seat Height – It is entirely too tall for me. I’m 5’ 10” and I can ride the bike just fine and even reach the ground on tiptoes at stoplights. The fact is that I don’t need the full suspension range of the KTM for my type of riding but I do want more feet on the ground so I can manage the bike in tough terrain. While KTM World is replacing the springs they are going to lower the suspension by 2”. That combined with the ½” I got by installing the Seat Concepts low boy seat gets me closer to the ground by 2 ½”. We’ll have to see how that feels.

Tame The Beast – Wasn’t sure what to call this section but “Tame The Beast” pretty well sums it up. If you read my previous couple of posts you could definitely tell I was surprised by the power and performance of the KTM 350. I’m just glad I didn’t find a 500, which was my original choice. The 350 has more power than I need but I have to be able to manage this power in critical situations. I don’t ride nor plan to ride serious single track through deep forest with radicle climbs embedded with rocks and tree roots. What I will be riding is steep mountain pass switchbacks with slick rock and loose gravel made for 4X4 vehicles. This requires a bike with great traction that can make the turn at 5 mph then climb a 30-40 degree incline. It also will need to ride through long stretches of baby head rocks, sand and mud. We encountered all of that on our recent CO to AR TAT ride in August and expect more of the same in Leg-3 next summer (CO to ID).

After much research and talking to riders who use the ReKluse auto clutch, I have received one made for the KTM 350 EXC-F and will install it in the near future. You can watch several YouTube videos for this product if you’re interested but it provides me several advantages:

1               The ability to climb in a higher gear, which will hopefully stop my inclination to do a wheelie due to using too much power in a lower gear.
2               Prevent the engine from stalling in critical situations due to hitting ruts, rocks, etc.
3               Eliminates the need to use the manual clutch, which is just one more thing to deal with in tough riding situations.

I know, this is considered cheating by serious dirt riders and that I should just learn to use the clutch or go back to my Honda CRF250L but sorry but that ain’t going to happen. One very good reason is that I don’t have the nerve to tell my wife that I spent this much money on a bike that I won’t be using on the TAT. For my own self-preservation she better see me ride off following the sun on an orange bike.

Modification Road Map – The pictures below show different steps of my disassembly this weekend. BTW the bike is on its side to get all the fuel to one side so I could siphon it out before removing the tank. This brings up a question I’ve had for a long time that maybe someone can answer. How does the fuel from the opposite side of these saddle type fuel tanks get over to the fuel outlet? There isn’t a crossover fuel line and the right side of the tank is lower than the center. Laying the bike over was my solution but I’m curious what the real answer is.

1               Today I shipped the struts and shock to KTM World. I expect to get them back around mid January. It’s too cold to ride anyway.
2               I received my new KTM fuel tank yesterday and installed it today.
3               Although I have received the ReKluse auto-clutch, I won’t install it until the bike is back together in January. The reason is that the set-up and break-in of the clutch requires the engine to be running and multiple high-speed starts. I want to ride the bike with the new suspension before I jump into another serious change of the bikes performance.

I may consider changing the sprockets based on several forums I’ve read but not until I have ridden the bike with the three above mods installed.

With these modifications completed I hope the KTM will be better suited for my TAT 2017 adventure. As a side note I discussed with KTM World the fact that I’ll probably be carrying an additional 40-50 lbs in a GL horseshoe bag on the rear seat/rack. They advised to set up the suspension for my normal riding weight (246 lbs) and just use 2 turns of the pre-load on the shock when I’m riding with the extra gear. The GL bag lets me put the weight in the ends that hang over the seat/rack. This will put less strain on the rear frame than carrying a 9 lb RotoPax mounted solely on the back end of the rack.

Bike will be down now for several weeks waiting for my suspension to return but with the holidays and cold weather, I’ll suffer through.

I had planned on talking about our Leg-3 plans but will save that for the next post.

Merry Christmas and a Happy New Year!