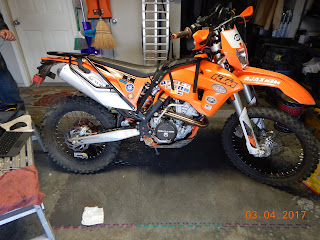
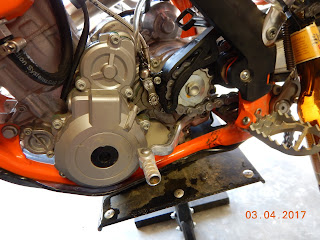
My son and I installed the ReKluse Auto-Clutch today. This post will give you a feeling of the
effort including where we had a couple of problems.
You’ll notice from the pics that my son was doing all the
work while I performed the management function and insured everything was done
correctly by reading the instructions and controlling the YouTube video
playback. Just kidding son.
As usual I now know how I could have accomplished this mod
better and I’ll note that in the text. I also can advise you of some issues we
found with the installation instructions.
We started shortly after sunrise (we’re both early risers)
and completed the clutch installation 4 hours later. I’m sure it could be done
in a shorter time frame but we were pretty careful comparing the ReKluse written
instructions against the ReKluse installation video plus digging out the torque
values from the KTM service manual. BTW the instructions tell you in several
areas to use the OEM manual for the torque values.
Everything went as expected until we had removed the old
clutch hardware and started putting the new hardware back in. The problem was
torqueing the main clutch nut. The KTM manual said this nut should be torque to
one value and we could not get even near that value with our torque wrench. The
reason was that as we tightened the nut it would turn the engine and rear
wheel. We tried several ideas including putting a hammer wooden handle into the
rear sprocket and several others. I then re-read the written instructions and
found they said torque it at a lower value than the KTM manual. We had gotten
close to that value so we tried again and this time got it torqued. Now I have
to admit only after we had the clutch back together did we even think about
using the REAR BRAKE LEVER to stop it from spinning. How dumb can you get?
Finally had the clutch installed and then started
installing the new ReKluse clutch slave solenoid that comes with the kit. This
is where we watched the video several times and they were able to get the old
slave solenoid off without taking off the rear chain. We could not get it off
without removing the chain, which we did. Then we had to bleed the clutch
system with DOT 4 brake fluid. The hydraulic clutch adjustment is pretty easy
but takes a while to do it correctly.
We were ready to see if the engine would start without
making terrible grinding noises from an improperly installed clutch. Engine
started and it sounded great. Now we did the break-in of the new clutch
hardware by revving the engine a number of times with the garage door down
since it was still pretty early on a Saturday morning. We then performed the adjustment
of the whole clutch system. You can watch the ReKluse video if you want the
details.
Next the instructions said to start in first gear and
accelerate to 5,000 RMP 20 times, then do it again 10 times in 2nd
gear. We did this at around 10 am on a Saturday in front of my son’s house. If
there were any late sleepers in the neighborhood, we gave them a wake-up alarm.
No cops showed up even though the KTM was pretty loud, especially with the
muffler mod I have installed. The clutch worked as advertised, coming to a
complete stop with the clutch handle out in first gear.
Now it was my turn to ride the KTM. It really feels strange
standing in first gear without holding the clutch handle. As soon as you apply
gas it accelerates off with no unusual operation. Here are a few observations
after riding the KTM for several hours on paved roads, dirt road and even some
easy single track:
1
Engine braking
still works. As you slow down to around 10-15 mph the clutch disengages but
descending down a hill I think it would almost be normal.
2
You still need to
use the hand clutch at least for going up/down through 1st, 2nd
and even 3rd gear. Higher gears can be changed without the hand
clutch. I even could change the lower gears as long as the engine wasn’t
pulling hard. This probably doesn’t make sense but I could tell when I could or
could not change gears without the clutch handle.
3
Climbing hills was
great fun in 2nd or 3rd gear by just applying gas without
messing with the clutch handle at all.
4
Riding single track
also didn’t need the clutch handle and I changed gears several times with no
problems.
In summary I like it a lot. I won’t know how it will work
on the TAT until I use it for a while.
After riding for a couple of hours we returned to the
garage to install the ReKluse Left Hand
Rear Break.
The first thing we did was try to install the hand break
lever in between the hand grip and switch cluster per the instructions. NO WAY
THIS WOULD WORK! The switch cluster just would not provide room enough for the
break lever mechanism and the clutch lever mechanism. I then went back to the
instructions and there in small print on the front page was this statement:
“For street legal bikes with large switch clusters, a thin
switch cluster may need to be installed”
Why wasn’t that on their web page before I spent $300+ for
this thing?? No information where to get this “thin switch cluster”. We jumped
in the truck and rode through heavy traffic to the KTM dealer only to find out
KTM doesn’t make a thin switch cluster for this bike. But one of the KTM
salesman said we need to talk to Joe in the maintenance area and he led me to
Joe.
I barely started explaining the problem when Joe said “You
need the thin switch cluster made by SICASS (an aftermarket part for the KTM).
He had installed several of these units and he said that was the only way to
make it work on the EXC type KTM. I thanked him for saving our bacon and we
went back to the garage. A quick search on the Internet and we found SICASS and
had the thin switch cluster on order.
Since there was no reason to continue with the break
installation, we put the KTM back together, cleaned up the garage and put all
the removed clutch parts in a box for safe keeping, just in case they ever need
to be re-installed.
Lessons learned or what I would do differently:
1
Wash the bike
first. My fault for riding through mud several days ago and not washing the
bike before starting the installation. We were very careful to keep the clutch
area clean but my bad for not doing it first.
2
Read every word of
the instructions and compare to the service manual before starting. I would
have found those details we discovered only after being in the middle of the
install. Look for notes about special tools required, etc. The KTM Service
Manual lists a KTM tool to hold the clutch basket while you torque the main nut
but neither the ReKluse instructions nor video even talked about how to do
this.
3
Doing the clutch
install would be difficult alone. I almost started this mod by myself but very
glad I did not: i.e. torque clutch nut, bleed clutch slave solenoid, etc.
In summary, I’ve installed the following mods on the KTM
with one more to do in the near future:
1
Replaced stock 2.25
gal tank with KTM OEM 3.45 gal tank
2
Removed all environmental control hardware (KTMH kit)
3
Installed new end cap on muffler (KTMH)
4
Installed new exhaust port (KTMH)
5
Installed airflow vanes in intake (KTMH)
6
Installed new fuel rail on throttle body (KTMH)
7
Installed wheel weights, front and back (KTMH)
8
Installed heavy weight springs in struts and shock
(KTMWorld)
9
Re-valved struts and shock (KTMWorld)
10
Lowered suspension by 2” (KTMWorld)
11
Installed Low Boy Seat (Seat Concepts)
12
Adjusted Throttle Position Sensor (TPS) with electronic
meter (KTMH)
13
Installed Scott Steering Dampener (Scott Performance)
14
Installed ReKluse Auto Clutch (ReKluse)
On shelf waiting
for installation:
1
Left hand rear brake kit (ReKluse) with SICASS thin switch
cluster
Ride On!!


Wake the neighbors? Heck, what about your wife?
ReplyDeleteAs a fellow tinkerer I am following this project with interest. I'm looking forward to a report from you after a ride on a few roads out in the National Forest. I didn't notice any solid hand protectors, like Bark Busters. I have fond memories of getting my fingers pinched when I brushed a tree with the handlebars, with the fondest being the time I brushed trees on both sides at once; I didn't wiggle the stock width bars to get thru cleanly. The solid hand protectors will also usually protect the hand levers in case of a spill. I thought that was you in all the pictures until I saw the two of you in the same shot.
I was at son's and wife stayed home. I still have a few mods to do to include solid hand guards, metal skid plate and new sprocket and chain to fine tune gearing.
ReplyDeleteReceived the SICASS slim-line switch unit yesterday so plan on installing it and left hand rear break this week-end.
ReplyDelete